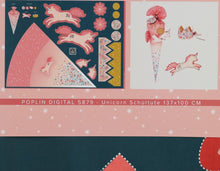
A cotton panel to make your own giant sweet/gift cone, 4 decorations for the tie string, a unicorn plush toy and a crown.
Please add iron-on interfacing, 1 meter is sufficient for 1 project. Iron-on fusible interfacing – Fabricasa fabrics
SEWING INSTRUCTIONS
SUPPLIES:
- 1 DIY Panel
- Cotton or polyester filling
- Iron-on interfacing
- Sewing machine and thread for stitching
- Needle and thread
- Cord or ribbon
INSTRUCTIONS:
- First cut out all of the parts.
CROWN:
- Cut the interfacing according to the crown’s pattern.
- Iron the interfacing on the reverse of the crown.
- Align the correct sides of the fabrics so that the correct
sides are facing each other, and pin them in place.
- Put the ribbon in between the ends of the crown.
- Stitch both sides together leaving an opening at the
bottom of the crown.
- Flip it over and sew the opening shut.
DECORATIONS:
- Align the fabric so that the correct sides are facing each
other, pin in place and stitch them together.
- Sew a ribbon on the top of the hangers so they can be
connected to the schultüte.
- Make sure to leave an opening for the cotton/polyester filling.
- Flip it over and stitch the opening shut after stuffing the
decorations with filling.
PLUSH TOY:
- Align the fabric so that the correct sides are facing each
other, pin in place and sew them together.
- Make sure to leave an opening for the filling.
- Flip it over and stitch the gap shut after stuffing the
decorations with filling
SCHULTÜTE:
- Trim the interfacing to fit the schultüte’s light pink part.
- Attach the interfacing to the fabric’s reverse side.
- Align the fabric and pin in place, now sew the long side
together.
- Leave the dark pink top unstitched and only fold and sew
the top edge together.
- Fill the schultüte and close it with the decorations and
ribbon.
Composition: 100% cotton
Size: 100x137 cm
Weight: 115g/m2


